Project V - Building the Ultimate Offline AI Testing Rig with Kali 2025.4 & Ollama llama 3
- Andy Gravett
- Mar 13
- 8 min read


Geek time, so unless you have been in a sandbox this week or not been paying attention the team at Kali Linux dropped 2025.4, you know the landscape is shifting. With the complete transition to Wayland on GNOME 49 and the introduction of native AI-driven tools like hexstrike-ai, OffSec is clearly signaling that artificial intelligence is no longer just a gimmick—it is a core component of modern offensive security.
But here is the candid reality: piping your sensitive red-team data, vulnerability scans, and proprietary codebases through a cloud API like OpenAI or Anthropic is a massive operational security risk. If you want to leverage AI for offensive security or analysis, you need to own the infrastructure.
That is where Ollama comes in.
In this build guide, we are completely ditching the cloud. We are going to walk through setting up a 100% local, offline, bare-metal Kali Linux 2025.4 environment powered by Ollama.
By the end of this, you will have a private Large Language Model running directly on your own hardware, capable of analyzing scripts, generating payloads, and acting as your personal, air-gapped security analyst.
What to Expect in This Build
Absolute Privacy: No telemetry, no API keys, and absolutely no data leaving your machine.
Hardware Demands: I'll be honest—local LLMs are incredibly VRAM-hungry. You cannot run a serious model smoothly on a potato. We will focus on utilizing NVIDIA GPUs and CUDA to do the heavy lifting.
The Foundation: We are using the latest Kali 2025.4, taking advantage of its newest under-the-hood performance tweaks and native AI integration capabilities.
Grab a coffee, double-check your backups, and let's get into it.
I cut my teeth on Backtrack in 2007 and lost plenty of sleep building and testing a lot of different security disto or pentesting virtual machines over the years, so luckily I had the perfect weapon in mind for this project I call her "Vengeance" or V for short setting up a bare-metal Kali Linux machine dedicated to running local Large Language Models (LLMs) was a no brainer.
V currently runs an Intel i7 Hexcore CPU, 32 Gb of Corsir SDRAM, with an NVIDIA GTX 1060 GPU with 6GB VRAM that is CUDA capable, that i've previously used for hashcat password cracking.
The latest version as of early 2026 is Kali Linux 2025.4, which recently introduced GNOME 49 (Wayland-only), Xfce color themes, and native AI pentesting tools like hexstrike-ai.

However, combining a penetration testing OS with local AI requires careful hardware planning. While Kali itself is pretty lightweight its no Blackarch either, local LLMs are incredibly resource-hungry, specifically when it comes to memory bandwidth and Video RAM (VRAM).
Here is the straightforward breakdown of the hardware you actually need, followed by a complete bare-metal installation guide.
Full System Requirements
To run this setup effectively, you must combine Kali's baseline requirements with the heavy demands of local AI inference.
Minimum (For 7B–8B parameter models, e.g., Llama 3 8B at 4-bit quantization)
CPU: Modern 6-core processor (Intel Core i5 10th Gen+ or AMD Ryzen 5 3600+).
RAM: 16 GB DDR4. (Kali needs ~2GB, but the LLM processes and context windows will eat the rest).
GPU: Dedicated NVIDIA GPU with 8 GB VRAM (e.g., RTX 3060 or 4060) * my GTX 1060 with 6GB VRAM worked sweet in testing keep reading.
Note: While AMD works, NVIDIA is strongly recommended on Linux because the CUDA ecosystem is vastly more stable and widely supported by tools like Ollama and vLLM.
Storage: 100 GB NVMe SSD. (Mechanical hard drives are too slow for loading model weights).
Recommended (For 13B–32B parameter models or advanced RAG tasks)
CPU: 8-core to 16-core processor (Intel Core i7/i9 or AMD Ryzen 7/9).
RAM: 32 GB to 64 GB DDR5.
GPU: Dedicated NVIDIA GPU with 24 GB VRAM (e.g., RTX 3090, RTX 4090, or the newer 50-series). This is the sweet spot for serious local AI.
Storage: 1 TB NVMe SSD. Models take up 5GB to 40GB each, and generating vector databases for local document scanning takes up space quickly.
Step-by-Step Bare Metal Installation Guide
This guide assumes you are installing Kali Linux 2025.4 as the primary operating system on your machine, completely wiping the target drive.
Step 1: Prepare the Bootable Media
Navigate to the official Kali Linux downloads page.
Download the Installer ISO for 64-bit (amd64). Do not download the Live ISO.
Download a USB flashing tool like Rufus (Windows) or balenaEtcher (Windows/macOS/Linux).
Insert a USB flash drive (at least 8GB).
Open Rufus/Etcher, select the Kali Linux 2025.4 ISO, target your USB drive, and hit Flash/Start.
Step 2: Configure the BIOS/UEFI
Plug the flashed USB into your target machine and turn it on.
Rapidly tap your BIOS/UEFI key (usually F2, F12, Del, or Esc depending on the manufacturer) before the OS loads.
Navigate to the Security tab and Disable Secure Boot. (Kali can boot with Secure Boot, but third-party NVIDIA GPU drivers required for LLMs will strictly refuse to load if Secure Boot is left on).
Navigate to the Boot tab and set your USB flash drive as the primary Boot Option #1.
Save changes and exit (usually F10).
Step 3: The Kali Linux Installation
When the machine reboots, you will see the Kali boot screen. Select Graphical Install.
Localization: Choose your Language, Location, and Keyboard layout.
Network Configuration: * Hostname: kali (or whatever you prefer).
Domain name: Leave blank unless you are joining a specific network domain.
User Setup: Enter your full name, create a username, and set a strong password. (Kali no longer uses root by default).
Partition Disks: * Select Guided - use entire disk.
Select your target hard drive (Double-check that you aren't selecting your USB!).
Select All files in one partition (best for standard setups).
Select Finish partitioning and write changes to disk, then confirm by selecting Yes.
Software Selection: Leave the defaults checked (Xfce desktop and standard Kali metapackages). If you prefer Wayland, you can opt for GNOME 49 here.
Bootloader: When asked to install the GRUB bootloader, select Yes and choose your primary hard drive (e.g., /dev/sda or /dev/nvme0n1).
Installation is complete. Remove the USB drive and click Continue to reboot into your new bare-metal Kali machine.
Post-Install: Setting up your Local LLM
Once you are logged into Kali, you need to install NVIDIA drivers and your LLM engine.
1. Install NVIDIA Proprietary Drivers (Crucial for GPU Acceleration)
Open your terminal (Ctrl+Alt+T) and update your system:
Bash
sudo apt update && sudo apt full-upgrade -y
sudo apt install nvidia-driver nvidia-cuda-toolkit -y
sudo reboot
2. Install Ollama
Ollama is currently the easiest and most robust way to run local LLMs on Linux. It automatically detects your NVIDIA GPU.
Open the terminal and run:
Bash
curl -fsSL https://ollama.com/install.sh | sh

Note: Go and make a cuppa as LLama 3 is 4.7 GB
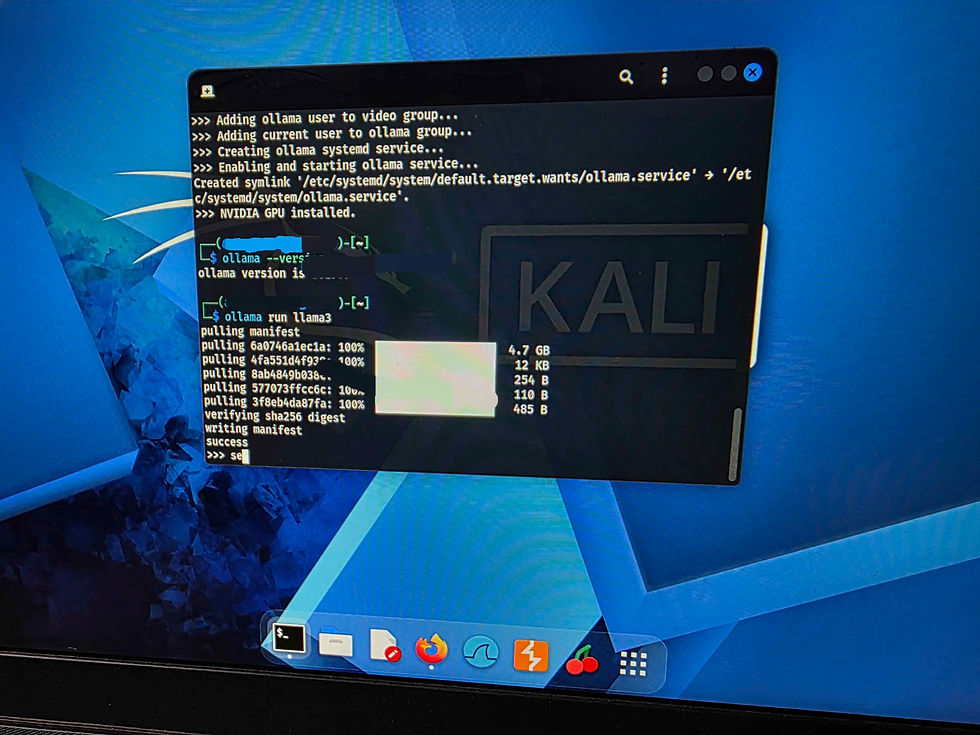
3. Run a Model
Once installed, you can immediately pull and run a model. For a great balance of speed and intelligence (assuming you have at least 8GB VRAM), try Llama 3.2:
Bash
ollama run llama3.2
The model will download (a few gigabytes) and drop you into a chat prompt right in your terminal. All processing is now happening 100% locally on your hardware.
Once Ollama 3 is installed your in at the chat prompt so the dodgy camera video was my test one was can you configure the Open WebUi for kali llm , I had to slow down the video of the response to half speed as V was blazing !
Step 1: Install Docker on Kali Linux
Kali doesn't come with Docker pre-installed, but it's readily available in the official repositories.
Open your terminal and run the following commands to install Docker and set it to start automatically:
Bash
sudo apt update
sudo apt install docker.io -y
sudo systemctl enable --now docker
(Optional but recommended) If you want to run Docker commands without typing sudo every time, add your user to the Docker group, then log out and log back in:
Bash
sudo usermod -aG docker $USER
Step 2: Download and Run Open WebUI
Now, you just need to pull the Open WebUI container and tell it how to talk to the Ollama service running on your bare metal.
Run this single command in your terminal. It will download the necessary files and start the server in the background:
Bash
sudo docker run -d -p 3000:8080 --add-host=host.docker.internal:host-gateway -v open-webui:/app/backend/data --name open-webui --restart always ghcr.io/open-webui/open-webui:main

Note2 : Go and make another cuppa as OpenWeb UI is about 5 GB
What this command does:
-d: Runs the container in the background (detached mode).
-p 3000:8080: Maps port 3000 on your Kali machine to the UI's internal port 8080.
--add-host=...: Allows the Docker container to "see" the Ollama service running on your main Kali OS.
-v open-webui...: Creates a persistent volume. This means if you restart your computer, your chat history and settings won't be deleted.
--restart always: Ensures the UI starts up automatically whenever you boot up your computer.
Step 3: Access Your Local AI Dashboard
Open your web browser in Kali (Firefox is the default).
Navigate to: http://localhost:3000
You will be greeted by an Open WebUI login screen. Because this is the very first time you are accessing it, click Sign Up.
Create an account (Name, Email, Password). Don't worry, this is entirely local to your machine. No data is sent to the internet. The first account created automatically becomes the Admin.
Once logged in, look at the top of the screen. You should see a dropdown menu where you can select the model you downloaded earlier (e.g., llama3.2).
Troubleshooting Docker networking and local services can be a headache, but it usually comes down to one of three things: the container crashed, there is a port conflict, or Open WebUI cannot talk to Ollama.
Let's break down the most common failure points and how to fix them on your Kali rig.
Phase 1: Is the Container Actually Running?
Sometimes the container fails to start but fails silently in the background.
Run this command to see all active Docker containers:
Bash
sudo docker ps
If the list is empty, the container crashed. You need to check the logs to see why:
Bash
sudo docker logs open-webui
Look for errors near the bottom, such as "address already in use" (meaning another app is using port 3000).
🔌 Phase 2: The "Server Connection Error" (Networking)
If you can load the Web UI at http://localhost:3000 but it says it cannot connect to the server (or models aren't showing up), Open WebUI is failing to communicate with Ollama.
By default, Linux Docker can sometimes struggle with the host.docker.internal routing we used.
Fix A: Verify Ollama is running on the host
Open your terminal and run:
Bash
curl http://localhost:11434
If it replies with Ollama is running, the service is fine. If it says "Connection refused", your Ollama service is down. Start it with sudo systemctl start ollama.
Fix B: Bind Ollama to all interfaces (The most common fix)
By default, Ollama only listens to 127.0.0.1 (localhost). When Open WebUI reaches out from inside the Docker container, it's technically coming from a different IP address (the Docker bridge network), so Ollama ignores it. We need to tell Ollama to listen to all local network traffic.
Open the Ollama service file:
Bash
sudo systemctl edit ollama.service
Add these exact lines to the file (this overrides the default configuration):
Ini, TOML
[Service] Environment="OLLAMA_HOST=0.0.0.0"
Save and exit (in nano, press Ctrl+O, Enter, then Ctrl+X).
Reload the daemon and restart Ollama:
Bash
sudo systemctl daemon-reload sudo systemctl restart ollama
Restart your Open WebUI container just to be safe:
Bash
sudo docker restart open-webui
Refresh your browser at http://localhost:3000. Your models should now appear.
Phase 3: The Nuclear Option (Host Networking)
If you still cannot access the UI at all, or the container keeps failing to route ports, you can bypass Docker's isolated network entirely and attach the container directly to your Kali machine's network stack.
Kill and remove the broken container:
Bash
sudo docker rm -f open-webui
Re-run it using --network host (this negates the need for the -p port mapping):
Bash
sudo docker run -d --network host -v open-webui:/app/backend/data -e OLLAMA_BASE_URL=http://127.0.0.1:11434 --name open-webui --restart always ghcr.io/open-webui/open-webui:main
Open WebUI will now be running on port 8080 instead of 3000 because it's using the container's native port directly on your host. Go to http://localhost:8080.


You now have a fully private, fully local AI dashboard running on bare-metal Kali Linux!
Summary
Kali Linux Team have done a great job on the ISO installer and the graphical install worked a treat.
Gnome desktop definitely an Improvement and looks sweet, even over Linux Mint Cinnamon.
GTX 1060 with 6GB VRAM still rocks as long as CUDA!
I'm going to take a deeper look at the other LLM in a future post so let me know on the comments, what you think of the latest Kali OLLAMA build!


Comments